|
|||||||||||||||
|
|||||||||||||||
Harry Potter TCG Apprentice Help/Tips This was written to help you use the Apprentice program with the Harry Potter TCG. Keep in mind that these are suggestions on how to use Apprentice to play Harry Potter TCG, not the rules themselves. If you are already familiar with Apprentice, you might just take a look at the 'How Do I Do That On Apprentice' section. Otherwise, just start at the beginning and work your way through it. This is not all there is, but it should be enough to get you playing Harry Potter TCG online! I.
Understanding the Terms in Using the Mouse Understanding the Terms in Using the Mouse Click = the left mouse button is
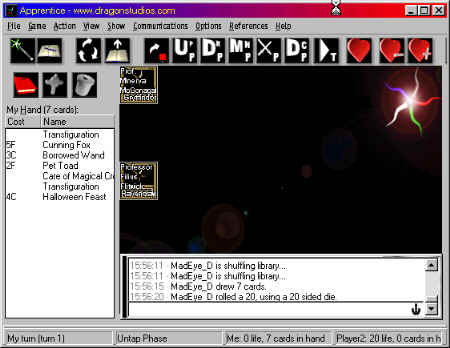
pressed and let go of quickly. What Parts Of Apprentice Do We Use The left area is your 'Hand.' The Buttons That Are Used- New Game: This is the 'Wand' button. When clicking this, you will abandon the present game and prepare to start a new one. Deck Editor: This is the 'Open Book with Pen' button. It opens a pop-up window that lets you work on deck building. Untap Cards: This is the 'Three Arrows making a Circle' button. When cards are marked 'Tapped' this will remove that mark on ALL your cards. (This is rarely used.) Draw a Card: This is the 'Open Book with Up Arrow' button. When clicked, this draws a card from the deck and puts it into you 'Hand.' If you want to draw more than one card at a time, you can hold down your shift key, then click it, and you will get a box asking you how many cards you want to draw. Just type in the number of cards you want and click 'OK.' (This is used most often at the beginning of a game to draw 7 cards for you 'Hand.') (Skipping the next 6 buttons) Next Turn: This is the 'Triangle with a 'T' next to it' button. You click this when your turn is over to let the other player know it is their turn to play. (Skipping the next 3 buttons) Ping / Reconnect: This is the 'Clock' or 'Light Bulb' button. Until you have disconnected from a player you will see the clock or 'Ping' button. It just let's you know if you're opponent is still connected when things are slow. HOWEVER, if you disconnect or get disconnected, this
button changes into a light bulb or 'Reconnect' button. In order to
reestablish a connection with someone, you BOTH need to do the following,
in the correct order. (The second row contains icons (for queues) not buttons although they look and act similar.) Library: This is the 'Closed Book' icon. This is your deck. If you double click it, you will shuffle your deck. (Once a game starts, it is important to know that you are not allowed to shuffle your deck unless a card tells you to do so.) If you put your mouse cursor over the 'Library' and do not move it, it will display the number of cards you have left in your deck. Graveyard: This is the 'Cross/Grave Stone' icon.
This is your discard pile. If you double click it, you will get a pop-up
window with a view of all the cards in your discard pile. This is used
for removing cards from your discard pile or to see what is in there.
In the Harry Potter TCG, you may look at this anytime during the game
and as often as you would like. (The last icon is not used.) Which Menu Options Are Used- File - Message Window Buffer: If for any reason you want to save the chat dialog from a game, you can use this to save it as a text or 'txt' file. (Note: it will be saved as 'noname.dec.txt' if you do not change the name.) You could then open it with most word processors to read it. Game - Decrement Turn: This is used if you accidentally click 'Next Turn' and need to set it back to the correct turn number. (This is rarely used.) Action - Create Card: This is used when need make a temporary score sheet for Quidditch Matches. Although most people will just use they're starting character that is already on the table to do this. Action - Flip a Coin: (Ctrl-F) This option is the used help decide who goes first. (Although, this method is rarely used. Most people prefer to roll a 20-sided die.) Action - Roll a Die: (Ctrl-I) This option is the used help decide who goes first. This is the preferred method of determining who goes first. A 20- sided die is usually used. Action - Hand - Move Hand to Graveyard: This will discard your entire 'Hand' to the 'Graveyard.' View - Opponent's Graveyard: This is your opponent's discard pile. If you choose this option, you will get a pop-up window with a view of all the cards in your opponent's discard pile. In the Harry Potter TCG, you may look at this anytime during the game and as often as you would like. View - My Library: This will give you a pop-up
window with a view of all the cards in your deck. It is initially used
to get your starting character out at the beginning of a game. However,
some cards allow you to look through your library and remove a card
from it. Once you find the card you want, drag-and-drop it to wherever
it is supposed to go, with one exception. View - Top Cards of My Library: This will give you a pop-up window and you type how many cards you wish to view and click OK. Then another pop-up window with a view of just those cards from your deck will come up. This is used in 2 ways, usually. The first is a card is telling you to look at the top 6 cards of your deck and put them back in any order. Just drag-and-drop them one at a time from the pop-up window to the 'Library.' Keep in mind that the first card you drag-and-drop will be the sixth from the top when you are done. The other way this is used is when having to discard
many cards it is easier to drag-and-drop from the pop-up window so that
you don't accidentally shuffle your deck or lose count while discarding. Show - My Hand: This will display a pop-up window of your 'Hand' to your opponent. You will see nothing except the description of what happened in the chat. Show - Top Cards of My Library: This will display
a pop-up window of a certain number of cards from the top of your library
to your opponent. You will see nothing except the description of what
happened in the chat. Communications - Disconnect: This will disconnect you from your opponent. Options - Preferences - General (Tab): Most people check all the boxes except the one that says, 'Alternate/Chaos Mode.' Options - Set Name: This should be set to the
same name that you chatted with, so players know who you are. It will
save on confusion. Note: If you play on the Pojo Harry Potter League
(http://www.myleague.com/harrypotter/ ), you are required to chat and
play under your league name. By the way, everyone is welcome to come
join our league! It is open to all ages! Starting A Game Where To Find Players- If you use the mIRC chat client, you can reach that
same location with these settings: How To Ask For A Game- Ladder Game: When asking or have been asked to play
a 'Ladder Game,' that means you belong to the league and want to play
a league match. You have to belong to the league to play a 'Ladder Game'
with someone. Note: Once again, everyone is invited to come join the
Pojo Harry Potter League! It is open to all ages! http://www.myleague.com/harrypotter/
How To Connect- If you are using windows: If you are using mIRC to chat: Apprentice has a way of displaying an IP address, but
it isn't always accurate. To find your IP address using Apprentice: (If neither of those help you, you might also check your connecting information; it may have it there as well.) When You Have Their IP Address- If they have done their part you will now be connected. If you did not connect, either go back to the chat telling them you are 'calling' or try the 'OK' button again. If the 'OK' button is available to click, you will not get connected unless you hit it again. When You Give Them Your IP Address- If they have done their part you will now be connected.
If you did not connect, go back to the chat telling them you are 'waiting.'
If the 'OK' button is available to click, you will not get connected
unless you hit it again. Solitaire Mode- Click the 'New Game' button. Setup The Game For Play- Click menu options: View - My Library This is how your board could look at this point.
How Do I Do That On Apprentice Miscellaneous Moves- View the 'Game Status': Use menu options; View - Game Status. Set a counter to a certain number on a card: Right click the card, from the pop-up menu, choose 'Set Counters,' in the new pop-up window type the number you want it set at and click 'OK.' Erase the counter on a card: Right click the card, from the pop-up menu, choose 'Set Counters,' in the new pop-up window type the number '0' and click 'OK.' Add one counter to a card: Right click the card, from the pop-up menu choose 'Add Counter.' Mark a card as used or 'Tapped': Double click the card while it is on the table. Unmark a card with 'Tapped' on it: Double click the
card while it is on the table. Drawing- Draw a certain number of cards: Hold down your shift
key, click the 'Draw a Card' button, in the pop-up window type in the
number of cards you want and click 'OK.' How And Where To Play A Card- Where to put lesson cards when playing them: Generally they are placed to the right of your starting character and either stacked downward or to the right. (see pic below) Where to put creature cards when playing them: Generally they are placed to the right side of your playing area. (see pic below) Where to put character, item, adventure, and location cards when playing them: As long as you keep this stuff together, it doesn't matter. Just keep them in your playing area like creatures. Where to put spell cards when playing them: If you are
playing a card that does not require a specific card to be removed,
generally we play it near the middle of the table. However, if you
Discarding/Putting Cards Into Your
'Graveyard'- Discard a large number of cards from your deck or 'Library':
Use menu options View - Top Cards of My Library. In the pop-up window
type the number of cards you wish to view and click OK. Then another
pop-up window with a view of just those cards from the top of your deck
will come up. Discard your entire 'Hand': Menu options; Action - Hand - Move Hand to Graveyard. Put a card from the table to the 'Graveyard': Drag-and-drop the card to the 'Graveyard.' Put a group of cards from the table to the 'Graveyard':
To make a box with your mouse, drag it on the table, but make sure only
the cards you want will be partly touching the inside of the box and
then let go of the mouse button. These cards will now have red border
around them. This is to let you know which cards you selected. (If you
made a mistake you can start over by making a tiny box anywhere on the
bare table.) Now right click any red bordered card and choose 'Bury.' Putting Cards Into Your (Deck) 'Library'- Put a card at the bottom of your 'Library': Hold down the shift key and Drag-and-drop the card to the 'Library.' Put a group of cards from the table to the 'Library': To make a box with your mouse, drag it on the table, but make sure only the cards you want will be partly touching the inside of the box and then let go of the mouse button. These cards will now have red border around them. This is to let you know which cards you selected. (If you made a mistake you can start over by making a tiny box anywhere on the bare table.) Now, right click any red bordered card and choose 'Return to Library.' Look at a certain number of cards from the top of your
(deck) 'Library' and put back in any order: Use menu options View -
Top Cards of My Library. In the pop-up window type the number of cards
you wish to view and click OK. Then another pop-up window with a view
of just those cards from the top of your deck will come up. Now, drag-and-drop
them one at a time from the pop-up window to the 'Library.' Keep in
mind that the first card you drag-and-drop will be the sixth from the
top when you are done. Putting Cards Into Your 'Hand'- Put a group of cards from the table into your 'Hand':
To make a box with your mouse, drag it on the table, but make sure only
the cards you want will be partly touching the inside of the box and
then let go of the mouse button. These cards will now have red border
around them. This is to let you know which cards you selected. (If you
made a mistake you can start over by making a tiny box anywhere on the
bare table.) Now right click any red bordered card and choose 'Return
to Hand.' Showing Your Opponent- Show your opponent the top cards of your 'Library': Viewing Card Information- View a card's details from the table: Right click the card and from the pop-up menu, choose 'View.' View a card's details from any pop-up window: Right click the card and from the pop-up menu, choose 'View.' View your 'Graveyard': Double click the 'Graveyard.' View your opponent's 'Graveyard': Use menu options;
View - Opponent's Graveyard. Reconnecting-
Once you both complete these steps,you should now be
reconnected if it is possible to do so. Building A Deck With The Editor Main Buttons- Create a New Deck: This is the 'New' button.
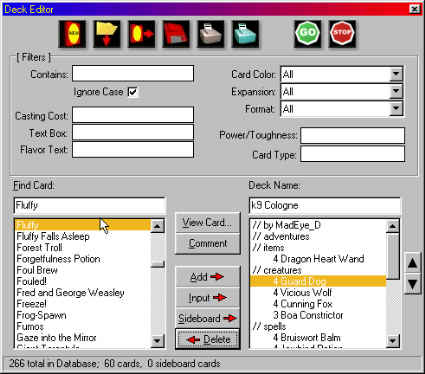
It empties the right side of cards. Load a Deck: This is the 'Folder with a Down Arrow' button. Click it and select the deck file, and click 'Open.' Export a Deck in Text Format: This is the 'Red Square, Yellow Circle with a Right Arrow' button. Click it, give your deck a name, click "Save' and it will be saved as a 'txt' file that most word processors can view. Print the Current Deck: This is the 'Silver Printer' button. This prints your current deck directly to your printer. Print the Card List: This is the 'Aqua Printer' button. This prints the entire card list directly to your printer. Apply Filter(s): This is the 'Green GO' button. When you click this it turns on your filter settings and the left side will only have the cards you asked for. Halt Filtering: This is the 'Red STOP'
button. When you click this it turns off your filter settings and will
display all the cards on the left side. Filters- Contains: By typing in a specific word, name, or phrase from the title of a card, you can limit the cards you view to include only cards that contain that specific word, name, or phrase in the title. For instance, if you wanted to view all the cards containing the word 'dragon' that is what you would enter and click the 'GO' button. Casting Cost: By typing in a specific Casting Cost, you can limit the cards you view to include only cards that require a specific amount of Power. You must also type in the type of power the card requires. For instance, if you wanted to view all Transfiguration cards that cost 5, you would type in '5t' and click the 'GO' button. F indicates Care of Magical Creatures. Otherwise, the letters correspond to the first letter of the lesson required. Text Box: By typing in a specific word, you can limit the cards you view to include only cards that contain that word in the text box. The text box on a card is where its effects are stated. So, if you wanted to view only cards that had the word draw in them, you would type in 'draw' and click the 'GO' button. Note, this function is probably not as useful as the others are because it includes all cards that contain that word, but you may find it useful in conjunction with the other filters. Flavor Text: (This isn't used.) But it will search the quotes that are on the card from the books. Card Color: By selecting a certain card color from the drop-down menu and clicking the 'GO' button, you can limit the cards you view to include only cards of a certain color. Artifact indicates Care of Magical Creatures, White indicates Characters, Land indicates Adventures, Black is not used. Otherwise, the colors correspond to those used in Harry Potter TCG. Expansion: By selecting an expansion from the drop-down menu and clicking the 'GO' button, you can limit the cards you view to include only cards in a certain expansion. For instance, if you wanted to make an all Quidditch Cup Deck, you would select QC - Quidditch Cup from the drop-down menu and click the 'GO' button. Format: Format refers to the quality of card, as in rare, uncommon, common, and lessons. By selecting a format from the drop-down menu and clicking the 'GO' button, you can limit the cards you view to include only cards in a certain format. The 'T2 Standard' option does not apply to Harry Potter TCG. Power/Toughness: By typing in a number or set of numbers, you can limit the cards you view to include only creatures with a certain Damage and/or Health. If you simply type in one number, it will include all creatures that have that number as their Damage or Health. If you type in a specific set of numbers (i.e. 0/1) you will view all creatures that match that ratio. The first number indicates Damage per turn, the second indicates Health. Card Type: By typing in a specific card type, you can limit the cards you view to include only cards of that type. Examples of this would be Books, Locations, Items, Unique, Gryffindor, Spell, etc. etc. NOTE: Remember that you can use all or none of these
at once, and you will have to undo any changes you made to the filter
if you want to look at a different set of cards. Just hit 'go' to use
the filter option when you have typed in the requirements you are looking
for. Action Buttons- 'View Card' Information: To do this, select a card and either right click it or click the "View' button. 'Comments': If you wish to add comments, like "spells" or "creatures" into your deck file, click the 'Comment' button, type your comment in the pop-up window, and click 'OK.' 'Add' A Card To Your Deck: To add a card to your deck, scroll down the list on the left, highlight the card you wish to add, and click the 'Add' button. This will put in one copy of that selected card into your deck. If you want more of the same card just click the 'Add' button again. Once you have all the cards you want on the right side, be sure to check the status line at the bottom to see that you have the correct total number of cards, 61. (Skipping the next 2 buttons.) 'Delete' A Card From Your Deck: If you need to take a card out of your deck, scroll down the list on the right, highlight the card you wish to delete, and click the 'Delete' button. This will take out one copy of that selected card.
To read more detailed information about
Harry Potter TCG deck building: Don't forget to save your deck
when you're done! |
|||||||||||||||